Blog

Author Archive

Export Products from the Shopping Cart

How do I export data from my shopping cart?
Check or Uncheck the checkboxes to choose the categories of products you would like to export and click the export button.  A .txt file will be saved to your computer.  To make it easy to find, you could save it directly to your desktop. 

A good way to view / edit the .txt file is to use Microsoft Excel, Open Office, or any other popular spreadsheet software.

To save this file using Open Office select Save As "Text CSV", and then select the option to "Edit Filter Settings". When you proceed the "Edit Filter Settings" window will come up; in that window leave Character Set at the default; Field Delimiter should be Tab; Text Delimiter should be blank (not "); Fixed Column width should not be checked.

Posted in: export

Leave a Comment (0) →

Gift Certificate Management


This section allows you to customize coupon codes and promotions for your shop.  This is seperate from Discount Options page.Navigation:
Manage > Gift Certificates
Gift Certificates
The first step to using the gift certificate function is to add a gift certificate in the Inventory Control Panel (Inventory > Inventory Main > Add Gift Certificate). Next a customer would need to purchase this item gift certificate. After this has occured, you will be able to see gift certficates listed on this screen.

Order ID
The Order # that was used to purchase the certificate.

Amount
This is the original dollar amount of the gift certificate.

Balance
The amount a customer has left with the gift certificate.

Active
Activating the discount code enables this code to be used on the checkout page by a customer, while setting it to no disables the code from being used.


�Green� Certificate order has been paid.
�Red� Payment pending for this order.


Posted in: shopmanual

Leave a Comment (0) →

Edit Pament Help Information

Edit Pament Help Information
This section alllows you to customize the payment methods you accept in the shopping cart.

Navigation:
Manage > Checkout Out Type / Payment Options > Payment Methods

   
(click here for larger image)

Choose a payment option from the suppoted credit card types
Payment Type:
You may wish to add common payment types.  Choose any from the list and click on the ‘Add Payment Type’

Payment Mode:
Choose if you will accept payment types online, offline, or both.  
Offline Payment
Accepting payments offline means your customer will NOT enter any payment information online; you will need to wait for your cutomer to mail/fax payment information.
Online Payment
Online payment means your customer will enter payment inforrmation online.  If you are using a real-time credit card gateway the card will be processed in real-time.

Add a custom payment type
You may add payment types not in the default list by using this field.  Type the custom field, choose the payment mode, and click ‘Add Payment’.  
 
In this field you are able to create a custom payment option called "Account".  This allows you to charge customers by an account.  To do so, add a "Net 30" or a payment option containing  "Account"  (not case sensitive) and it will disable credit card validation checks.

Payment types currently enabled for this shop are below
Here you are able to view/edit the current payment types for the shop.  You may change the name of a payment you accept by click in the box, typing your change and clicking on the ‘Update’ button.

Posted in: paymenttype

Leave a Comment (0) →

View Pending Orders

SECTIONS
 Sales Graph  Automated Order Transmission
 Completed Order Options  Configure Stamps.com
 Export Orders  Order Display Options
Orders Page

Navigation:
Orders

Overview of the Orders Page
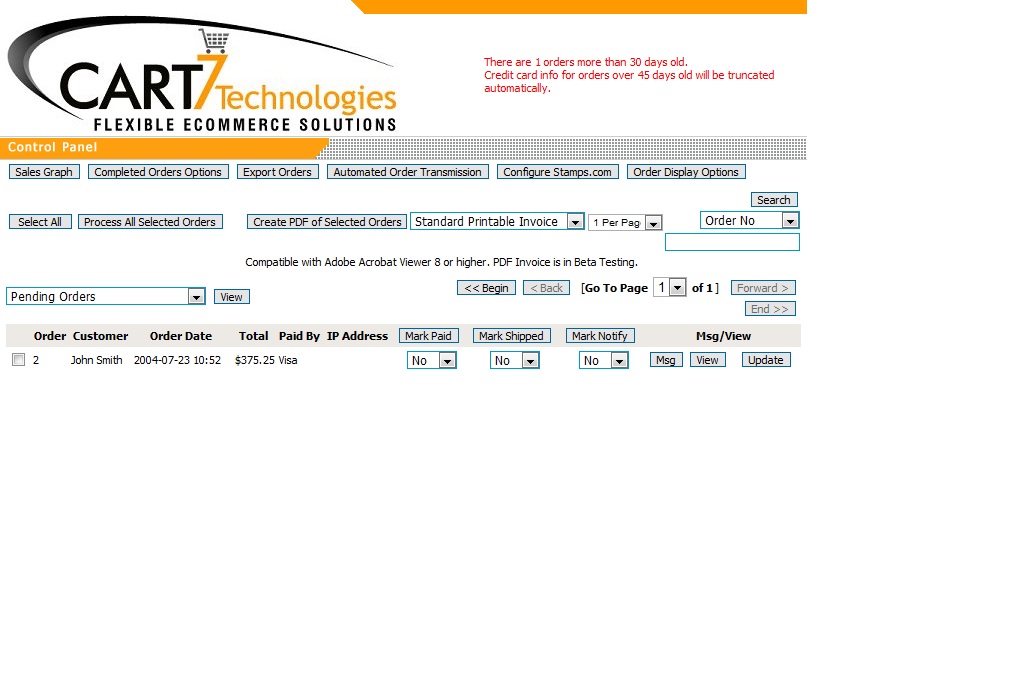
The orders page let’s you see a snapshot of the all your orders that have been placed.  Shop owners can update the order status, create printable PDF’s of invoices or packing slips , and create a Message (Msg) that is sent along
with the shipment confirmation email.

They can also filter the orders in the drop down bar with several options:
All Orders
Pending Orders
Orders Paid but not shipped
Orders Not Paid and not shipped
Orders Completed (Paid & Shipped)

Update Order Status
To mark completed:
Set the following to ‘Yes’:
Mark Paid (if your cards are not processed in real-time),
Mark Shipped,
Mark Notify (if you would like to send a shipment confirmation email)

Along with this email you can send a message (seen in the top pat of the email). Many shop owners use this feature to send tracking #.

Once you have made these changes, you are able to click the "The "Update" button.

View
The "View" button allows you to look at the details for an order. If you process cards through the ‘Secure Checkout’ form of checkout, you
would be able to view the card details here.
Click Here to learn about the ‘View’ button.

Search
There is also a search function which allows you search by Order Number, Invoice Number, Customer Email, or Last Name.

Posted in: shopmanual

Leave a Comment (0) →

Shopping Cart – Set Up Inventory

Managing Inventory Options in your Shopping Cart  

Click on a links below to find instructions for each specific sections.

SECTIONS
 Add Item  Inventory Count Control
 Add Gift Certificate  Create Thumbnail Multiple Items
 Add Downloadable Item  Multiple Item Delete
 Add "Fill-In" Price Item  View Unique Item Counts
 Edit Item
Inventory Main Page
The main Inventory Control allows you to perform a number of functions relating to the items in your inventory

Inventory > Inventory Main 
View your items by category 
To narrow you item choices by category, use this function to view the different items

Search Inventory by:
You are able to search the inventory by:
– Name
– Brand
– SKU (part #)
– Description
– Display Product in Cart (search based on whether a product is displayed in the cart or not)
– Out of Stock items

Edit Item
This is one of the more important links found in the shopping cart.   You’ll be able to edit what your item’s name, description, image, etc.

Copy Item
To copy an item, select ‘Copy’, and the item will be immediately copied.  The screen that you are brought to is the copied item, which you can edit and alter from the original item.

Delete Item
Deleting an Item will ask for confirmation, and then you will be able to select and delete the item.

Up/Down Options
These options allow you to change the order that the items appear to customers in the shop.  You also have the ability to move the item to the top through the "Move to 1st" option.

Posted in: setupinv

Leave a Comment (0) →

Shopping Cart Manual

Introduction: You will be setting up the shopping cart from the shop control panel at http://www.yourdomain.com/shop/owner/ (where ‘yourdomain.com’ is replaced with your actual domain name. The Shop Owner’s control panel is a simple, web-based interface where you can add items and configure your shop).

Please click on the buttons below to learn more about each section of the shopping cart control panel.

(Click here for more info.)

Login Page: When you go to the shop control panel,  you will come to a Login Page that looks like the image to the right.

You will need to enter the password in the box marked ‘Password’. Your password will be listed in your ‘Web Site Settings Email’ sent to you when you created your account.

Main Page: Once you have logged into your shop’s control panel, you will see a number of buttons.Each of the different sections serves different purposes; to read about each specific section, Click on the links Below.


General Settings


This is where you should start building your shop. In this section, you can dictate the complete look and feel of your shop; you can set your shipping options; you can set your inventory control and much more. Click here to learn more!


Setup Inventory


This is where you should start setting adding items to your shop and adding categories.  Click here to learn more!
This is where you set up categories for your shop items. Click here to learn more!


Integration


This is where you can look at several options for integrating the shop with your website.  This section is typically used by webmasters who have knowledge of HTML.  Click here to learn more!


Import / Export


This function is used to import or export a Tab Delimited File containing your Inventory or to Export or Import a Database Dump. Click here to learn how to use this feature.
Click here to learn how to change the forms of payment you accept.
Click here to learn how to edit your Checkout Type.


Edit Locations


Click here to set up taxes and places you will accept orders from.


View Orders


To learn how to use the myriad features of this section -> Click Here
Keep in touch with your registered customers by sending out period newletters. Click here to learn how!


Gift Management


If you offer gift certificates in the shopping cart, click here to learn how to manage them.
USE this GREAT advertising FEATURE! Click here to learn more!Why an Affiliate program?


Posted in: shopmanual

Leave a Comment (0) →
Page 12 of 21 «...1011121314...»